Abstract
In this section, we will add on to the simple state we created in the last section. We will use user input to modify the existing state.
Introduction
In the last section, we learned how to create state via Cells and also
how to create derived states.
We used building a fantasy game character sheet as an example.
We’ll continue with that to learn how to modify state.
Handling User Input
Let’s start with changing our character’s name.
We’ll need to add a text input field in the [UI] section.
We can’t just use regular HTML components.
The Common Tools runtime has its own JSX components to
make sure data is protected and not accessed by
other scripts.
    <common-send-message
      name="Update"
      placeholder="Update Name"
      // we need to fill out the event listener attribute below
      // onmessagesend=
    />
If you deploy this update, you’ll see an input field, but nothing happens when you enter data. As the comments indicate, we need to fill out code for the onmessagesend JSX event listener.
This is when we learn about handler.
A handler is a Common Tools runtime component that, like its name
suggests, handles events.
The JSX event listener (such as onmessagesend in our code) will call
our handler to handle the event emitted by the JSX component.
Understanding Handlers
Handlers in Common Tools have a specific signature:
handler<EventType, ArgsType>(handlerFunction)The handler function takes:
Two type parameters:
EventType: defines the event data structureArgsType: defines the arguments/context that you want to pass to the handler
One argument: we pass in a function which receives:
event(matches EventType) as its first parameterargs(matches ArgsType) as its second parameter
Detailed explanation
The handler function returns a factory that you call with your actual arguments to create the event handler. This factory pattern allows the handler to bind specific values from your recipe while still receiving events from the UI components.
We’ll start by writing our handler which takes the event emitted by the
<common-send-message> component. This component emits a CustomEvent with the structure {detail: {message: string}},
where message contains the text the user entered.
The handler will also take in the
characterName cell. It will simply set the cell with the new name
from the event.
Creating the Handler
const updateName = handler<
  { detail: { message: string } },
  { characterName: Cell<string> }
>(
  (event, { characterName }) => {
    console.log("Updating character name to:", event.detail.message);
    characterName.set(event.detail.message);
  }
);
Note that characterName was passed in as a Cell. We created it via the
cell() function, which returns us a Cell. It’s important to
mark reactive components as Cell so that we can call methods such
as set() on them.
Now we can attach this handler to our input component:
<common-send-message
  name="Update"
  placeholder="Update Name"
  onmessagesend={updateName({ characterName })}
/>
If you deploy this code, you should see something like:
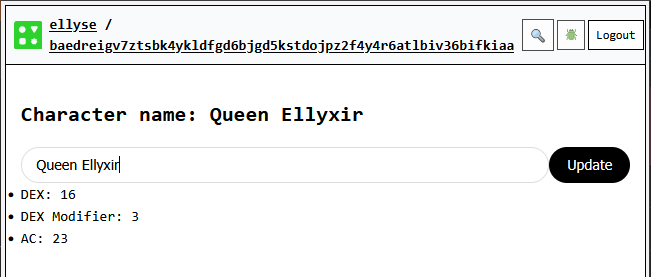 Figure: Updating your character’s name
View complete code
/// <cts-enable />
import {
  cell,
  h,
  recipe,
  UI,
  lift,
  derive,
  handler,
  type Cell,
} from "commontools";

const calcAC = (dex: number) : number =>
  20 + Math.floor((dex - 10) / 2);

const updateName = handler<
  { detail: { message: string } },
  { characterName: Cell<string> }
>(
  (event, { characterName }) => {
    console.log("Updating character name to:", event.detail.message);
    characterName.set(event.detail.message);
  }
);

export default recipe("state test", () => {
  const characterName = cell<string>("");
  characterName.set("Lady Ellyxir");
  const dex = cell<number>(16);
  const ac = lift(calcAC)(dex);

  return {
    [UI]: (
      <div>
        <h2>Character name: {characterName}</h2>
        <common-send-message
          name="Update"
          placeholder="Update Name"
          onmessagesend={updateName({ characterName })}
        />
        <li>DEX: {dex}</li>
        <li>DEX Modifier: {Math.floor((dex - 10) / 2)}</li>
        <li>AC: {ac}</li>
      </div>
    ),
  };
});
Et voilà ! We’ve fully implemented modifying state through user input.
Detailed explanation
Each cell is created with a cause that uniquely identifies it.
We carefully construct the cause so that it remains the same
each time a recipe is run, but also unique from other cells created.
This leads to automatic persistence when using the Common Tools
runtime.
Adding Buttons
We’ll create a button to roll “dice” for the character’s Dexterity value. This will update the existing value.
First let’s create the handler for the click event. We
don’t need details on the event itself, so we mark it as unknown.
const rollD6 = () => Math.floor(Math.random() * 6) + 1;

const rollDex = handler<
  unknown,
  Cell<number>
>(
  (_, dex) => {
    // Roll 3d6 for new DEX value
    const roll = rollD6() + rollD6() + rollD6();
    dex.set(roll);
  }
);
This handler simulates rolling three six-sided dice (3d6) and sets the DEX value to the result.
Next, we’ll add a button beside DEX in the UI and attach our handler:
Note the {" "} between the DEX value and button - this adds just a little padding before the button.
When we click on the button, the elements that depend on the value of that cell are also updated. This means the DEX, DEX Modifier, and AC values are all updated.
You should see something like the following once you click on the Roll button:

View complete code
/// <cts-enable />
import {
cell,
h,
recipe,
UI,
lift,
derive,
handler,
type Cell,
} from "commontools";
const calcAC = (dex: number) : number =>
20 + Math.floor((dex - 10) / 2);
const updateName = handler<
{ detail: { message: string } },
{ characterName: Cell<string> }
>(
(event, { characterName }) => {
characterName.set(event.detail.message);
}
);
const rollD6 = () => Math.floor(Math.random() * 6) + 1;
const rollDex = handler<
unknown,
Cell<number>
>(
(_, dex) => {
// Roll 3d6 for new DEX value
const roll = rollD6() + rollD6() + rollD6();
dex.set(roll);
}
);
export default recipe("state test", () => {
const characterName = cell<string>("");
characterName.set("Lady Ellyxir");
const dex = cell<number>(16);
const ac = lift(calcAC)(dex);
return {
[UI]: (
<div>
<h2>Character name: {characterName}</h2>
<common-send-message
name="Update"
placeholder="Update Name"
onmessagesend={updateName({ characterName })}
/>
<li>
  DEX: {dex}
  {" "}
  <ct-button onClick={rollDex(dex)}>
    Roll
  </ct-button>
</li>
<li>DEX Modifier: {Math.floor((dex - 10) / 2)}</li>
<li>AC: {ac}</li>
</div>
),
};
});
So far, we’ve been using Cell to store primitive data types.
In the next section, we’ll move on to objects and arrays.